Showing posts with label recipes. Show all posts

Sunday, March 28, 2010

Sometimes I amaze myself.

In order to be a more "motherly-type" mom (rather than the super cool "rock n roll type mom I seem to naturally be)(that's a joke, folks), I decided to try and make candy. Well, also because it seemed fun, and a cheaper way to indulge myself than buying $14.00 boxes of English Toffee in Charleston. My mother told me it was really hard to make, to I entered into this endeavor holding my breath.

Guess what?


Easy peasy! And so delish!

I followed a combination of this recipe and added almonds inside the toffee and crushed walnuts on top of the exterior chocolate, the way I like it best.

Here's the process and how it turned out. Freaking faboosh!

Melting the butter and sugar:


Spreading the toffee on a cookie sheet after mixing in the almonds. Then smearing chocolate chips on top until they melt.


Final product with crushed walnuts on top:

Wowza, this is better than a Heath bar. This is better than what I bought in Charleston. This is candy crack. I need an intervention.

Mom, guess what you are getting for your birthday???

Monday, November 9, 2009

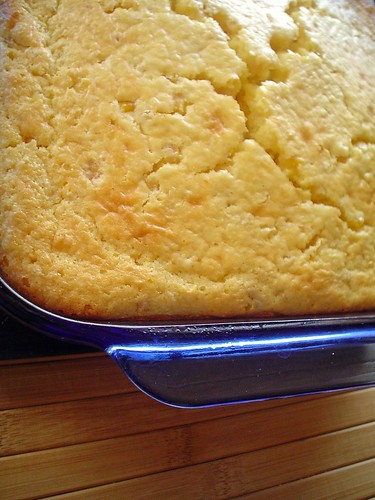
Maple Cheesy Corn Bread


I am not a fan of corn bread. I've always thought it is too gritty and coarse for bread. I prefer my bread soft or chewy. Not gritty. Blech.


Butttttt...... having another rainy day here and too many boxes of STUFF in the pantry, I decided to make some just to get rid of the box, and who knows, maybe Charlie would like it. She seems to like everything. I need to cook some of this stuff and make some room for newer, fresher, healthier stuff.

So I followed the directions on the box, but I also added (in the interest of using up more ingredients) a cup of frozen corn, a half cup of shredded sharp cheddar cheese, and a dollop of maple syrup.

WELL.

Can I tell you.

Corn bread has a new fan.

Try it. It's freaking FABULOUS!

The frozen corn adds nuggets of hot sweetness which explodes between your teeth. The cheese adds some salty sharpness, along with moisture and strands of gooeyness. And the maple syrup... SMELLS..... DIVINE.....

Add a pat of hot buttery goodness....

O.M.G.

Next time, I'm going to add some crumbled cooked bacon, to balance the sweetness with some salt. In the past, I've found that combo is delectable.

Try it sometime, it's delish.

PS HAPPY BIRTHDAY TO MY COUSIN DANICUZ!!!!!!!!!!

Sunday, October 11, 2009

White Chocolate Bread


I came across this recipe for Club Med's White Ch0cocolate Bread and the description of the finished product sounded so delicious, I had to try it. The description also mentioned it was good the next day as toast, so I was sold.

Throw in a rainy day and nothing much else to do, and today was the time to try the recipe.

It's a very simple recipe, here's a step by step with pictures. Now, I'm not a "baker" at all... I've actually never baked anything other than slice-your-own cookies... so the "lightly kneading" part of the recipe confused me and I'm not sure I got right. The dough was a little too watery to stay in a "ball" as called for, so I added some flour and got a round shape, not exactly ball -like.


Step 1) Mix ingredients in a bowl and use electric mixer for 12 minutes.


Step 2) Make sure daughter has something to play with.


Step 3) Don't give daughter a white chocolate chip or she will practice sign language for "more" for 12 minutes.


(Click on this picture to get huge piece of cuteness.)

Step 4) Empty bowl and lightly knead dough into a ball. Let sit for 20 minutes.


Step 5) Convince daughter chips are "all gone", chase her from toilet bowl where she tried to drown the remote.


Step 6) Clean sticky dough off remote, daughter, the camera, computer, and your hands.

Step 7) Preheat oven to 450.

Step 8)Cut the dough into 4 portions and knead into the desired form. (Note: These looked like loaves of cr-p when I saw them on the rack, ready to bake.)


Step 9) I made this step up, it's not in the original recipe, but I thought it was a good idea: Scramble an egg and use a brush to brush one light layer of egg onto the bread's crust.


Step 10) Bake for 20 minutes or until evenly brown on parchment paper. Do NOT believe your friend when you call her from the grocery and she tells you wax paper is just as good. Wax paper burns. I had a house full of black smoke. The fire alarm, amazingly, did not wake Charlie up from her nap even though she was sleeping right underneath it.

(Click on this pic to actually see smoke commencing.)


Ta dahh!!!!!! Doesn't it look FABULOUS? YUM! It tastes like heaven on a rainy day, I can tell you that much. Feel free to copy the recipe below (the real one). If you do copy it, please leave a comment so I know whether to continue trying recipes on this blog or not.
Up top is what it's supposed to look like, this is what it actually looks like...


And yes, I did give some to Charlie, even though there is sugar in the bread.... at least it's made from scratch and not refined bread with 50 ingredients (check out Wonder Bread or Sarah Lee's ingredient list!!!! They have 100 ingredients, mostly chemicals!). I also used King Arthur flour and saw they had whole wheat flour, so next time I may try it with whole wheat and make it a healthier option.


Club Med Sandpiper's White Chocolate Bread
41/3 cups flour
1 teaspoon yeast
1 teaspoon sugar
2 teaspoon salt
21/2 cups water
21/3 cups white chocolate chips

Place the flour, yeast, sugar and salt in a small bowl, and mix with an electric mixer.

Mix on medium-low speed for 1 minute. Add water, and mix another 12 minutes on medium or second speed. Add the chips and mix for an additional 2-3 minutes or until the chips are well distributed throughout the dough.

Take dough out of the bowl and lightly knead into a ball. Let rest for 15-20 minutes.

Preheat oven to 450 degrees.

Cut the dough into 4 portions and knead into the desired form. (Note: These looked like French bread loaves when we saw them on the rack, ready to bake.)

Place the loaves on a baking pan lined with parchment paper and bake for approximately 20 minutes or until nicely browned.

Makes 20 servings (4 loaves).

Sunday, May 3, 2009

Nom nom nom! Tuna tostadas...

Last night I had some friends over (working on #7 from this list) and tried out a new recipe. They all wanted copies of the recipe, which is the ultimate compliment :-) This was the first time I was trying this out, but it was delicious and definitely easy enough to serve again.

The prep:
Chop up tomatoes, cilantro, lettuce, onions, an avocado, a jalepeno pepper, and cheese. Put in a bowl. Also put some sour cream in a bowl.


In a mixing bowl combine 1 can of albacore tuna and 1 teaspoon Tabasco sauce. Add tomato, cilantro, sour cream, lime juice, and 1/4 teaspoon salt (all to taste, don't put the whole bowl in! Leave a lot in the bowls for fixin's later). Mix well and cover to chill.

With a spoon, scoop the avocado into a medium bowl and mash with a fork, add salt to taste.

Heat overn to 350 F. Spray tortillas on both sides with cooking spray. Cook on baking sheet for 10 minutes.

To assemble, spread 1 tablespoon avocado on each tortilla. Distribute 1/3 cup tuna mixture over avocado.

Then either top with tomato lettuce, jalepenos, cilantro, and a dollop of sour cream for the cold version.

Or...

Top with tomato, jalepeno, cilantro, and grated cheese and broil on high for 5 minutes until cheese is melted.

Both versions were excellent, with the melted cheese version winning by a hair.


And on another note, for my animal loving friends, guess what I found in my Balinese (cow) Bell? A bird's nest! They chose this huge bell that I have hanging on my front porch to nest in, rather than the 3 other types of "real" nesting milieus I have provided. Oh well! As long as they are happy :-)


(10 points to the first peron to tell me what the Balinese Cow bell is used for. It is way too large to hang from a cow.)